With the constantly moving landscape in IT it’s always worth your while to get to know new stuff, if nothing more than to know what someone in a meeting is talking about.
To that extent I’ve recently been playing around with Ansible, which is a method to automate IT infrastructure – Networking kit in my realm. I’d read through a few articles on the web and so far I’ve built the beginning of a Cisco Ansible lab within GNS3 so wanted to share this with you.
Taken from the Ansible website:
“Ansible delivers simple IT automation that ends repetitive tasks and frees up DevOps teams for more strategic work.”
Or, for me as a Network Engineer, it can stop me having to log into 30 different switches to create a new vlan :p.
What I Have
At the moment I have the following setup, which I’ll run through:
- 2 Routers setup in GNS3
- an Ubuntu server VM
- Ansible comms from VM into GNS3 and the ability to run Ansible code on the Ubuntu server and retrieve output from the Routers in GNS3
How It’s Setup
- Firstly I downloaded the latest Ubuntu Desktop image off their website and created myself a VM within VM Workstation in my case, but you can you Oracle Virtual Box or VM Player.

You will then want to update the VM with the latest repository code and install Ansible, so you’ll need to make sure the VM has internet access.
- Update all of your packages
sudo apt-get update -y
Sudo will raise your privileges to a root user and the -y switch will accept any forthcoming yes/no prompts during the update.
2. Update your VM firewall – May be required depending on Ubuntu version
sudo ufw allow 22
3. Install Ansible on your Ubuntu VM
sudo apt-get install software-properties-common
sudo apt-add-repository ppa:ansible/ansible
sudo apt-get update -y
sudo apt-get install ansible
4. Create your lab within GNS3
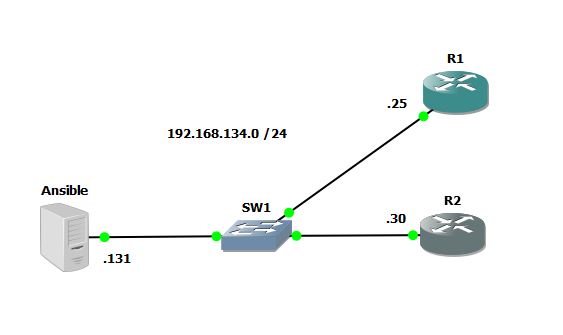
Create a new project and drag a Cloud onto your topology window. Then configure your Cloud to reside on the same subnet as you plan to have your 2, 3, 4, 20 routers on.

In my case I have all of my devices on the Host-only network 1, however I have also given my Ubuntu server a second NIC, which is NAT’d to my local host so it has internet access. Oh and I changed the icon of my cloud to be a server, as it looks prettier……

5. Configure your end-hosts that you want to pull config from using Ansible. In our case these are our routers.
*Your IP’s will obviously relate to the subnet your hosts reside in and your interface will be whatever you’ve chosen.
conf t
interface fa0/0
ip address 192.168.134.25 255.255.255.0
no shut
You should now, all being well be able to ping between your Ubuntu VM and your routers, and vice versa.
R1#ping 192.168.134.131
Type escape sequence to abort.
Sending 5, 100-byte ICMP Echos to 192.168.134.131, timeout is 2 seconds:
!!!!!
Success rate is 100 percent (5/5), round-trip min/avg/max = 8/12/16 ms
R1#
R2#ping 192.168.134.131
Type escape sequence to abort.
Sending 5, 100-byte ICMP Echos to 192.168.134.131, timeout is 2 seconds:
!!!!!
Success rate is 100 percent (5/5), round-trip min/avg/max = 4/9/12 ms
R2#
ish@ubuntu:~$ ping 192.168.134.25
PING 192.168.134.25 (192.168.134.25) 56(84) bytes of data.
64 bytes from 192.168.134.25: icmp_seq=1 ttl=255 time=9.18 ms
64 bytes from 192.168.134.25: icmp_seq=2 ttl=255 time=4.23 ms
^C
— 192.168.134.25 ping statistics —
4 packets transmitted, 4 received, 0% packet loss, time 3004ms
rtt min/avg/max/mdev = 4.230/7.758/11.212/2.658 ms
ish@ubuntu:~$
ish@ubuntu:~$ ping 192.168.134.30
PING 192.168.134.30 (192.168.134.30) 56(84) bytes of data.
64 bytes from 192.168.134.30: icmp_seq=1 ttl=255 time=9.48 ms
64 bytes from 192.168.134.30: icmp_seq=2 ttl=255 time=11.1 ms
^C
— 192.168.134.30 ping statistics —
4 packets transmitted, 4 received, 0% packet loss, time 3006ms
rtt min/avg/max/mdev = 4.042/7.733/11.194/2.785 ms
ish@ubuntu:~$
* If ping doesn’t work it’s always worth turning off your Windows firewall temporarily a re-check.
6. Configure SSH on your end-hosts
I am using 3725 series Cisco Routers in my lab – IOS c3725-adventerprisek9-mz.124-25d.bin, but you should be OK using any router image as long as it supports K9 – just remember to set that Idle PC!
conf t
ip domain name lab
crypto key generate rsa general-keys modulus 1024
aaa new-model
aaa authentication login default local
username cisco secret cisco
enable secret cisco
7. Add your end-host IP addresses to the /etc/ansible hosts file within your Ubuntu VM
ish@ubuntu:~$ cd /etc/ansible/
ish@ubuntu:/etc/ansible$ sudo nano hosts
[Routers]
R1 ansible_host=192.168.134.25
R2 ansible_host=192.168.134.30
Ctrl + x + y to save your edited file and exit out
ish@ubuntu:/etc/ansible$ cat hosts
R1 ansible_host=192.168.134.25
R2 ansible_host=192.168.134.30
ish@ubuntu:/etc/ansible$
8. Test your configuration
We can run the following command from the command line of our Ubuntu VM.
cd /etc/ansible
ansible all -m raw -a ‘show version | i uptime’ -u cisco -k
You should be prompted for the device password and if that’s entered correctly the following should be printed.
ish@ubuntu:/etc/ansible$ ansible all -m raw -a ‘show version | i uptime’ -u cisco -k
SSH password:
R2 | SUCCESS | rc=0 >>
R2 uptime is 2 hours, 4 minutes
Shared connection to 192.168.134.30 closed.
R1 | SUCCESS | rc=0 >>
R1 uptime is 2 hours, 4 minutes
Shared connection to 192.168.134.25 closed.
ish@ubuntu:/etc/ansible$
There we have it. I plan to delve into this much more and the use of Ansible Playbooks, but to simply test Ansible commands over SSH this should do nicely.
Router Config, if required, can be found here.
I.


")

