To quote the CISSP study material I’ve consumed to achieve my CISSP Certification;
“Threat modelling is the security process where potential threats are identified, categorised, and analysed.”
The goal should be to begin threat modelling early in the design process of a system and continue through-out it’s lifecycle. This attempts to reduce vulnerabilities and reduce the impact of remaining vulnerabilities (acceptable risk level). This approach looks to predict threats and designing in defences during the coding phase, instead of relying on post-deployment updates and patches. Unfortunately not all threats can be predicted, therefore a reactive approach to threat modeling must take place after a solution has been deployed.
There are more threats than there are grains of sand on the sea shore, so it’s important to use a structured approach to identify relevant threats. There are three common approaches that can be used;
- Focused on Assets.
- Uses asset valuation results and looks to identify threats to the valuable assets. For example if an asset hosts data, access controls can be evaluated to identify threats.
- Uses asset valuation results and looks to identify threats to the valuable assets. For example if an asset hosts data, access controls can be evaluated to identify threats.
- Focused on Attackers.
- Identifies potential attackers and the threats they represent based on the attacker’s goals. For example a government may be able to identify potential attackers and what they are looking to achieve.
- Identifies potential attackers and the threats they represent based on the attacker’s goals. For example a government may be able to identify potential attackers and what they are looking to achieve.
- Focused on Software.
- If a company develops software, it can look to consider any potential threats against that software. An example would be organisations that develop their own web pages that use more sophisticated programming, and thus present additional attack vectors to would-be attackers.
It is common to pair threats with vulnerabilities to identify threats that can exploit vulnerabilities and impact a business. When attempting to log and categorise threats, it is useful to use a guide or reference model. One such model is Microsoft’s categorisation scheme known as the STRIDE threat model. It is often used to assess threats again software applications or operating systems, but can be used in other contexts too, such as Network threats and Host threats. STRIDE is an acronym for;
- Spoofing.
- The act of falsifying a logical identity to gain access to a system. Examples would be IP addresses, MAC addresses, usernames, system names.
- Tampering.
- An action resulting in unauthorised changes to manipulation of data in transit or in storage. Such attacks are are a violatio of integrity as well as availability from a CIA Triad perspective.
- Repudiation.
- The ability of an attacker or user to deny having performed an action or activity. Attackers may carry out such attacks to not be help accountable for their actions.
- Information Disclosure.
- The distribution of private, confidential, or controlled information to an external or unauthorised entity. Such omissions in the development stage such as failing to remove debugging code, leaving sample applications in place, and not sanitising applications can be causes.
- Denial of Service.
- An attack that aims to prevent authorised use of a resource. This can be achieved through flaw exploitation, connection overloading, or traffic flooding.
- Elevation of Privilege.
- An attack where a limited user account is transformed into an account with greater privileges. This could be via social exploitation to gain credentials of a higher-level user account, or an application exploit that temporarily or permanently grants additional powers to an account.
There is also a more risk-centric threat modelling methodology – PASTA, which aims to select or develop contermeasures in relation to the value of the assets to be projected. The seven stages of PASTA are;
- Stage 1 – Definition of the Objectives (DO) for the Analysis of Risk
- Stage 2 – Definition of the Technical Scope (DTS)
- Stage 3 – Application Decomposition and Analysis (ADA)
- Stage 4 – Threat Analysis (TA)
- Stage 5 – Weakness and Vulnerability Analysis (WVA)
- Stage 6 – Attack Modelling & Simulation (AMS)
- Stage 7 – Risk Analysis & Management (RAM)
For each stage of PASTA there are a specific list of objectives to achieve and deliverables to produce in order to complete the stage. More information on PASTA can be found on the informative blog post by Nick Kurtley here.
Other methodologies include Trike, which also focuses on a risk-based approach, and DREAD (Disaster, Reproducibility, Exploitability, Affected Users, and Discoverability) which follows the STRIDE method by depending on aggregated threat model output. VAST (Visual, Agile, and Simple Threat) is another concept, but focuses on Agile project management and programming principles, with the goal of integrating threat and risk management into an Agile programming environment on a scalable basis.
Determining and Diagramming Potential Attacks
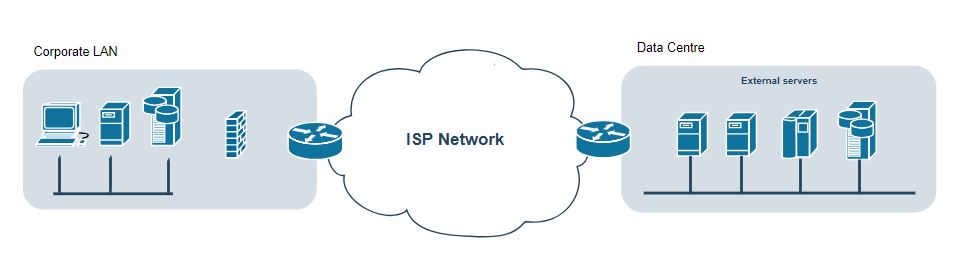
Once you have a grasp in regards to the threats facing your development project or deployed infrastructure, the next step in threat modelling is to determine the potential attach vectors that could be exploited. I, along with many others find visualising the solution and it’s transactions to identify, and mitigate where deemed necessary.

Once a diagram has been crafted, identify all of the technologies involved. This will include operating systems, applications, and protocols. Be specific down to versions of software. With this list all forms of attacks can be considered, including logical/technical, physical, and social. Examples could include spoofing, tampering, and social engineering.
The next phase of threat modelling is Reduction Analysis.